There are a lot of musical devices to swallow. If you’re a beginner to the musical world, you’ll hear words like amplifiers, compressors, and preamps a lot. If you intend on recording, mixing, or producing your music, you need to learn how each of these works and what they’re used for.
Audio compressors are devices used in mixing to reduce the peaks and transients. Here, I’ll tell you how they work, what they’re used for, and how to control them.
What Is a Compressor in Music?
A compressor is a musical device used to lower the dynamic range of the sound. This way, the quiet and loud parts in a musical piece are closer to each other with a lower level difference of dB. Consequently, the compressor causes the dynamic range to become narrower.
Musicians usually use compression to lessen the loud transient peaks. For example, do you know when a singer decides to throw a high note amid a gentle performance?
Without a compressor, the high note will sound jarring and a bit shocking. That’s where compression kicks in to improve the output.
The compressor causes a slight distortion in the signal to adjust the sound, changing the original sound. It causes this distortion by putting emphasis on some harmonics, leveling the quieter and louder parts.
If the compressor isn’t good, the distortion will be evident in the resulting sound. It needs to be transparent and subtle for the output to sound good.
Understanding Audio Compression

If you want to understand how audio compressors work, you need to understand compression as a concept first. What is it, and how does it improve the sound? You’ll find beginner musicians asking these questions all the time.
To put it simply, all compression does is lower the dynamic range of the music. How does it do so?
It brings the loudest parts down, so they’re not too far away from the quiet parts. As a result, the volume variations are more subtle without ruining the song’s mood.
When you have a compressor, you have the dynamic volume changes under control. Plus, the device boosts the compressed signal’s level after leveling the quiet and loud parts. This way, the end result has the softer parts sounding boosted.
These adjustments help your recording fit much easier into your mix. So, in the end, you have a balanced sound with just the right amount of transients. But remember, too many transients can cause your sound to be unnatural to the ear.
What Are Transients?
Understanding transients is essential for understanding how to use audio compressors. A transient is a high-energy moment of the sound, and it’s usually louder than the rest of the waveform. Because transients are noisy, the compressors catch them and tone them down immediately.
When there’s a loud sound coming up, an initial peak occurs in the waveform before slowly toning down. This particular peak is transient.
More often than not, if the waveform has good dynamics, a lot of transients will occur. Too many transients can cause the sound to be too dynamic for your ears. Likewise, when there are no transients at all, the sound will be lifeless.
That’s why compressors are essential—to balance out the transient sounds.
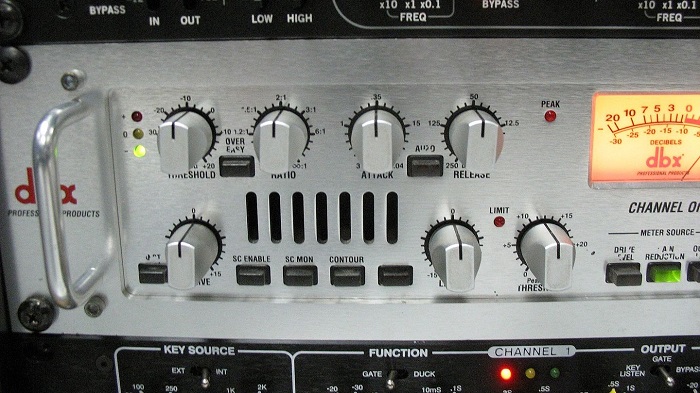
What Are the Controls of an Audio Compressor?
Like any recording or mixing device, the audio compressor has many controls that you can change according to how you want your output to sound. Here’s a brief list of these controls, and I’ll get into their details afterward.
- Threshold: The signal’s loudness before compression
- Ratio: How much reduction applies
- Attack: How quickly the compressor works
- Release: How fast the compressor stops
- Knee: How the compressor reacts when it passes the threshold
- Makeup gain: The boosting of the compressed signal
Now, here are detailed overviews of each of these controls and how to use them.
Threshold
The threshold on the compressor dictates the signal level before the device starts working. It’s measured in dB. When you set a specific dB for the threshold, any signal above it will be compressed.
So technically, setting the threshold is choosing which part of your signal you want the compressor to reduce. If you put it low, the compressor will apply the gain reduction to most of your signal. On the other hand, if you set it high, the device will only reduce the aggressive, apparent peaks.
To choose the suitable threshold for your recording, you must determine what you want to accomplish with the resulting sound.
Not only that, but you also need to mark the most problematic signals, so you can consider them when setting the threshold. For example, if the loud transients ruin the rest of the mix, you know you need to reduce them.
You can keep trying and playing the track until you find the perfect threshold. After that, it depends solely on your preferences.
Ratio

The ratio determines how much compression is applied when the signal crosses the threshold, measured in gain reduction. It’s a ratio instead of a single number because it’s determined with regard to the signal’s level. For example, if the ratio is 5:1, it means your compressor needs to cross the threshold by 5dB to increase the output level by 1dB.
Consequently, this means a regular, uncompressed signal has a 1:1 ratio.
When the first number of the ratio is higher, the gain reduction occurs at a higher factor. Likewise, a lower first number means the compression is gentler.
In this case, you can apply the compression over the whole mix because it’s subtle. When the first number is high, the compression gives a jarring effect, so it can’t be spread over the entire mix.
That’s why musicians mostly use ratios between 1.5:1 and 10:1.
You can test the ratio by increasing it gradually and listening to the gain reduction effect. Once it becomes too apparent, affecting the sound, it’s your cue to stop.
Attack and Release
The attack and release are separate controls, but they’re parts of the same range. They determine when the gain reduction starts and when it stops, according to your signal and threshold.
The compressor starts working when the signal crosses your set threshold, reducing the gain according to your fixed ratio. The attack and release controls don’t control this process, but they determine how the compressor will reduce the signals.

For example, you can use them to decide whether the compressor pushes the gain reduction’s full range once in a bursting move or gradually. If they aren’t set well, the compression won’t sound as natural as you want it to be.
If you set your attack control too fast, the transients will be squashed. On the other hand, if you set the release too fast, you get a pumping effect that sounds odd and totally unnatural.
Generally, you need to be fully aware of your sound’s needs to use the attack and release controls. You also need to know which elements you prefer to keep dynamic and use the controls accordingly.
Knee
The knee is basically the behavior of your compressor when the signal approaches and crosses the threshold. It supposedly smoothes out the transition between the before and after of the compressing—before being without any compression and after being the compression at your set ratio.
There are two types of knee: soft and hard. The soft knee causes the compression to happen gradually, starting once the signal approaches the threshold and until it passes it. Meanwhile, the hard knee means the reduction happens at once with a sharp corner, starting from when the signal approaches the threshold and all the way on.
The hard knee may sound unnatural or abrupt, so you need to know when to use it and when not to.
Generally, the soft knee accounts for a gentler, smoother compression because it happens gradually.
Knees are measured in dB, and they dictate how the transition goes between action and inaction regions.
To choose the type of knee you want to use, you need to think of the output sound you want to get. For example, hard knees result in edgy sounds because the compressor acts almost rapidly, and the distortion happens at a high frequency. Meanwhile, soft knees result in smooth tones.
Makeup Gain
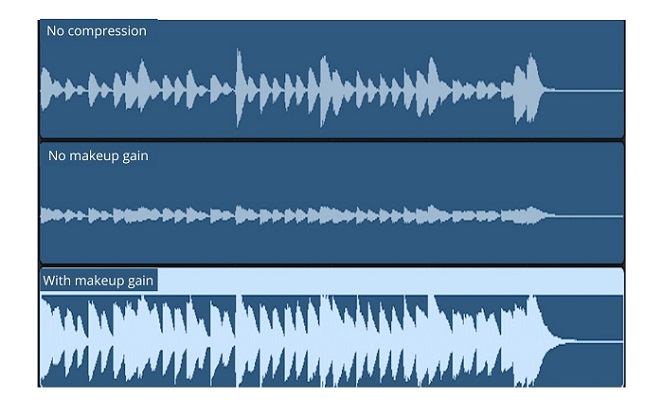
The makeup gain parameter boosts the overall signal that results from the compressions. It aims at compensating for the lost gain, so the music doesn’t sound quiet after the reduction.
You need makeup gain because the compression only affects the signal when it crosses the threshold. As a result of that, the louder parts of the signal turn out quiet, compromising the sound of your whole mix.
When you use the makeup gain, you amplify the whole signal. Meaning, the quiet parts get boosted with the louder ones.
As a result, your signal’s dynamic range will get narrower, and the background noise will be more audible. Musicians usually use the makeup gain controls to get the output RMS to equal the input RMS.
Different Types of Compression
There are different types of compressions that musicians can use for different purposes. Here’s a roundup of the most common types.
VCA Compression
Voltage-controlled amplifier compressors, or VCA compressors, in short, give incredibly precise control through an integrated circuit. These compressors result in minimal distortion, and they don’t have a lot of side effects. That’s why they’re highly versatile, and they’re used for a large variety of tasks.
Opto Compression
Opto compression is short for optical. In Opto compressions, the compression’s gain reduction is controlled by light-sensitive circuits. These circuits are highly precise, so the Opto compressors are slower than the other types.
Some optical compressors serve as leveling amplifiers as well, which means you can keep them on all the time, not only when your signal reaches the threshold.
FET Compression

FET is short for field effect. FET compressors utilize transistors and a high signal:noise ratio to imitate the valve sound. These devices are best known for drum compression and vocal recordings.
How to Use an Audio Compressor
To use an audio compressor, you have to set it up first. Luckily for you, that’s not a challenging task if you know what you’re doing. Here are the steps you need to take.
- To set up your compressor, start by inserting it on the channel you need to compress. This step is essential whether you’re using a plugin or a hardware compressor.
- Start adjusting the threshold control until you see the signal’s peak crossing over the set value.
- Adjust the ratio value according to the sound you want and the instrument you’re using. Generally, both vocals and drums need a 2:1 ratio, while bass guitars would serve well at a ratio of 4:1. If you’re using electric guitars, you have a wide range to choose from. Anything from 2:1 to 6:1 will do.
- When adjusting the ratio, adjust the threshold accordingly, and try them. Both work in collaboration, so you can change them together to see how the output sounds like.
- Now, it’s time for the attack and release controls. They both control the compressor’s reactions. If you’re working on a rap recording or anything fast in general, you can adjust a fast attack. If you’re mastering, you’ll need a slow attack.
- When changing the release, bear in mind that long releases result in a more natural sound. Meanwhile, short releases will make you feel as if the device is working harder than it should. You should adjust them according to your goals.
- After you’re done adjusting the attack and release, it’s time to control the makeup gain. In this step, you’re boosting the overall signal so that it sits into your mix without background noise.
- Now, adjust the knee according to your preference. Soft knees are subtle, so they’re better for guitar sounds and vocals. On the other hand, hard knees are ideal for bass and drums because they cause the compression to happen at once.
- If you have a plugin compressor, it’ll probably have a look-ahead feature. After you’re done adjusting all the controls, you can use this feature to add a slight delay to your music. When it does that, the compressor is able to catch all the loud peaks smoothly and seamlessly. It’s worth noting, though, that it may ruin the compressor’s effect if used excessively. So, make sure to only use it when you need it.
Mistakes to Avoid When Using Audio Compressors
Using audio compressors without experience can negatively impact your output. If you want to get the controls right on your first try, you’ll need to follow some tips. Here are some mistakes to avoid when using audio compressors.
Setting the Attack Too Fast
Many people are tempted to use fast attacks, especially with percussive elements. It’s true, fast attacks can add style to your music, but they may also cause the drums’ sound to drown in the noise.
When you’re setting the attack, make sure to keep it from reducing the drums’ sound. This usually happens with fast attacks because the beginning of the sound is basically squashed.
Distorting Low Frequencies
Sometimes, choosing specific attack and release times can result in distorted low frequencies. Usually, this issue happens with hardware compressors, especially with beginner musicians. However, it may happen with plugins as well if you choose the wrong attack and release times.
For example, if you want to tone down the transients of a bass guitar or some loud instrument, you’ll most likely set a fast attack. When you do, you’ll hear a noticeable distortion in the sound.
Here, the distortion occurs because low frequencies usually have long periods. When the attack is too fast, the gain reduction works in one sound wave cycle at a time. As a result, the waveform is clipped, and the sound gets distorted.
To prevent this, you can use the look-ahead function in your plugin. It allows the compressor to start working before the transient even happens. This way, the long waves have enough time to pass without causing distortion.
If you have a hardware compressor, you can use a hi-pass filter that hides the low frequencies from the detector’s range.
What Are Parallel and Side-Chain Compressions?

When you start learning about compression, you’ll hear the terms parallel and sidechain a lot. Parallel compression is the mixing of two signals—one that’s slightly compressed and one that’s heavily compressed. Sometimes, the latter also goes through a hi-pass filter.
Parallel compression results in a smooth, crisp sound that’s free of squeezed transients, high notes, and high peaks.
As for sidechain compression, it utilizes one instrument to achieve the gain reduction on another one. So, for example, if you want a bass sound to get compressed each time the performer kicks the drums, you’ll insert your audio compressor and adjust it for sidechain compression.
Sidechain compression keeps the overall mix boosted while controlling the bass sounds and getting them out of the way.