
Have you ever heard a mix made out of random tracks pieced together?
Chances are, you might be listening to a collection of stem files.
Making a song involves layering several stem files together to create one final product, whether it’s for music or film production.
Stems can be broken down into several categories depending on genre.
For instance, if you’re producing a heavy metal mix, the stem might include the bass, drums, electric guitar, vocals, and more.
Stick around to learn more about stems, their benefits, and how you can use them for your music or film editing projects.
Stems in a Nutshell
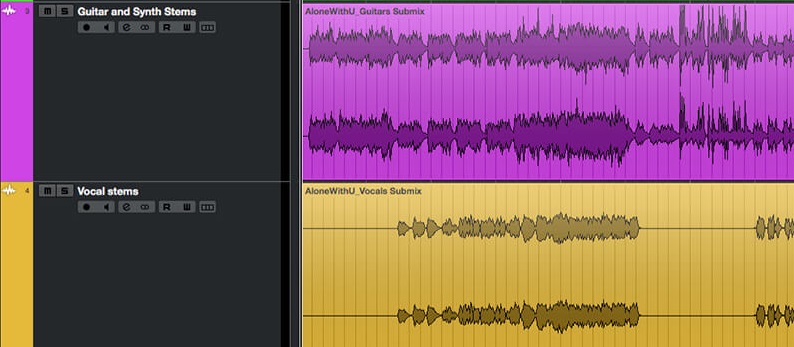
Stems are the tracks that make up a mastered song or music product. In most cases, they include the bass, melody, instruments, and drums.
Stems can be used in a variety of fields such as film and music editing, DJ mixing, and more.
What Are Stems in Music?
Looking more in-depth into the topic, stems aren’t necessarily limited to fixed categories like bass, melody, and so on.
Instead, you can choose to make up your own divisions.
For example, I made a YouTube video before and decided to use stems to include dubbing and background music.
The tracks added within the video are basically the stem files.
I chose to add several layers such as soft vocals and lo-fi beats to move seamlessly with my dubbing voice.
When given stem files, a music producer wouldn’t be able to control the individual tracks. Instead, they’ll be able to adjust how each track mends with the others.
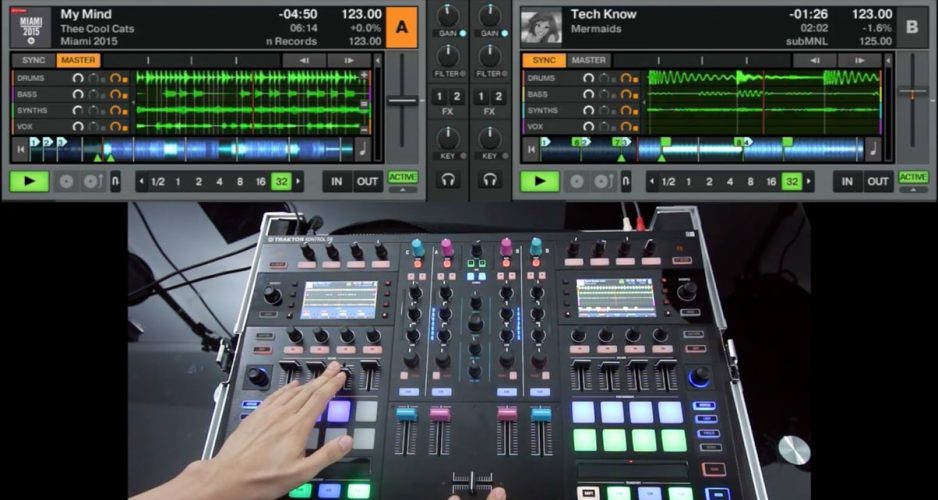
A classic example of this can be found in DJ tracks.
DJs can take popular songs and create mashups by simply mixing their stem files.
They can take a song’s vocals and add another song’s melody and instruments to the mix to create a new music product.
When it comes to the song’s vocal track, individually, you won’t be able to alter them.
This sort of production is ideal if a track needs to be revisited by higher chains of delivery.
That way, they might be able to change the stem files, but not the sub-tracks themselves, which can cause a larger altercation of the product.
DJs use stem files as an easier means of music production. These sorts of files are easier to move around and mix into new musical creations.
The Difference Between Multitracks and Stems
One of the biggest misconceptions you can find in music production is differentiating between stems and multitracks.
The contrast mainly lies in one crucial element: the number of tracks a song is divided into.
Lots of people may have been guilty of using the term stem and multitrack interchangeably, but here’s what’s right: multitracks are the sub-tracks of stems.
In other words, the latter is made up of the prior.
To make things easier, let’s look at a classical song production. The stem files would probably be labeled “horns,” “violin,” “trumpet,” etc.
Meanwhile, multitracks would go into each of the stems’ components and divide them into individual tracks such as “violin 1,” “violin 2,” and “trumpet 3.”
The Uses of Multitracks
Multitracks are mainly operated by mixing engineers. They typically have more control over the individual tracks, unlike stems.
In the case of guitars, these engineers can change up the audio performance of each guitar track to raise one track’s volume over the other, adjust their pitching, and more.
After aligning the guitar tracks together, they can then form a guitar stem file, as well as other instrumental files that music producers can adjust to their liking.
Check out some of the benefits and uses of multitracks below.
More Control Over Track
Stems don’t offer as much control as multitracks during the music production process.
Mixing engineers and music producers need a more refined piece of each instrument’s track to edit it. The more detailed the process, the better the outcome.

Music specialists often need that high level of control over multitracks to alter several characteristics and features.
Some of these modifications could include frequency-changing, compressions, as well as pitch adjustments.
Dry Sound Options
Dry sounds in music mainly refer to sounds that have no added features, effects, or enhancements, as opposed to wet sounds.
Simply put, dry sounds are raw recordings. Oftentimes, stems are usually already enhanced with wet sounds.
On the other hand, multitracks can offer dry sound options because you can copy the track and add the needed enhancements to the new track.
You’ll still have the raw recording present in your file to use for other modifications.
Enhanced Music Production
Music production is not exactly a piece of cake. Starting from raw recordings all the way to the final product, it can be quite time-consuming.
Being prepared with all of the multitracks is the best way to keep track of the whole process.
Before sending them to your mixing engineer, you’ll want to make sure that they’re all named accordingly.
Otherwise, they’ll have to group random multitracks to make up the entire song. After recording the multitracks, you can send it over to the mixing engineer.
Afterward, you’ll hand it over to the mastering engineer with the final stem files to sequence.
The Uses of Stems
Stems have multiple uses in audio production.
Whenever you’re working with a record company, it’s best to understand the uses of stems to create a final cut.
Here are some instances where you can use stems.
Mastering Your Song
Mastering a track involves adding some final enhancements for ultimate distribution.
Even though some tracks may be mastered as a whole, most mixing engineers would prefer stem files.
Stem files would help target certain enhancements depending on separate components like the vocals.
Sometimes the bass could be overpowering the guitar. Stem files will make these adjustments much easier to ensure a balanced output.
Having said that, polishing up each stem file will make for a more well-organized and improved final track.
Remixing Your Song

Stem files are the holy grail of remixing.
Remixes have revolutionized the music industry by tailoring genre-specific songs to a wider audience, allowing for more distribution.
Now, lots of DJs may prefer to remix using stem files because they can simply adjust each track to mix with other ones, rather than having to deal with a massive amount of multitracks.
From each stem file, they can cut it up, enhance it, or blend it easily.
Several programs have been developed specifically for this use. DJs can modify their stem sequencing to fit their liking.
Rebalancing Your Track
Rebalancing music means changing a track where you can keep it purely instrumental without vocals or vice versa.
You can rebalance your music for several reasons such as using the instrumental for background music or adding vocals to a remix track, and the list goes on.
Imagine having to deal with a large dose of multitracks when you only want the vocals removed from the track.
That’s why rebalancing wouldn’t be done easily without the help of separating the track into stem files.
The files are more accessible and well sorted out to work with.
Adding Vocals to Your Song
You might be working on the instrumental portion of your song. Once you’ve completed it, you could be considering adding some vocals.
After cutting a deal with a vocalist, you’ll have to send over a stem file of the song for them to record with.
It would be much easier to send a stem file than a larger, more confusing compilation of individual multitracks.
Your vocalist will thank you if you send stem files because they might need to separately listen to a certain component like the guitar to get in the flow.
Benefits of Using Stem
Using stem files in music production eases the process in a lot of ways. Check out the many ways you can benefit from using stems:
Ease of Collaboration
Music collaborations are largely trendy. All the big artists are jumping on this feature-filled bandwagon.
What makes collaborations much easier? Stem files!
If you want to work on a collaboration with other artists, all you have to do is send them your stems.
Then, they can add their own vocals or instrumentals to take your track to the next level.
It doesn’t have to necessarily be restricted to adding files, collaborators can subtract stem files as well.
It might enhance their own rhythm or add a new genre to the track. One thing’s for sure, though; it’ll be a fun process to dabble in.
Progress Maintenance
Keeping track of all your files is essential when producing music. Multitrack filing can be excessively thorough but beneficial organization-wise.
Nevertheless, stem filing is a lot simpler to maintain progress with.
Your track might not necessarily be for one song alone; you could be holding multitracks for a large number of songs or tracks.
In this instance, grouping each multitrack respective to their songs will be easier to keep account of.
The best part is that stems usually use supported file types, making them easier to open on all outlets. Multitracks may need specific software to work on.
Increase Artistic Possibilities

Using stems opens a lot of opportunities to get creative with your music. Whether you add or subtract files, you’ll get endless variations of your track.
Using stems in your music could be similar to sampling.
You can even sample other artist tracks into your mix to create a new product during the mixing process.
Defining Stem Mastering
While looking at stems, you might find the term categorized into stem mastering.
Let’s first break it down by defining mastering. This stage in music production comes after the mixing phase.
It basically means adding some final touches such as balancing sonic elements and playback optimization.
In most scenarios, a final single track is sent to the mastering engineer to complete.
With stem mastering, stem files are sent instead. This adds a higher level of versatility to the engineer’s work.
Mastering a single track can be difficult since some changes can affect other elements of the track.
For example, if the mastering engineer tries to increase the drum frequency, it can negatively affect the vocals turnout.
Stem mastering helps avoid this issue by dividing these tracks.
Perfecting each instrument and vocals on their own will create a higher quality result. It’ll also make the mastering engineer’s life easier.
Stem Mastering vs. Mixing

There might be some confusion circulating between the mixing and mastering stages.
Some people may think both terms hold the same meaning. To put it simply, mixing comes before mastering.
In the mixing stage, you’re essentially taking all the raw recordings from the multitracks and adding all the necessary changes to them.
After stemming the files, you can sequence them in the last step, stem mastering.
Why Use Stem Mastering
Since stem mastering provides you with a simpler process, you can feel more comfortable handing it to any mastering engineer.
If they’re not as experienced or well-trained as you hoped, the mastering shouldn’t be too difficult to work with.
You could also use stem mastering in situations where you’re unsure of the last mixing stage.
If there are additional tweaks you want to add, then stem mastering is the way to go.
That being so, it would be best to fully complete the mixing phase properly. Cutting corners will only make things worse during the mastering process.
Mixing and Mastering Without Using Stems

After understanding the work that goes into mixing and stem mastering, you might be wondering if you can complete it without using stems.
The answer is yes, you can. You can reap the benefits of having more control over mixing multitracks by focusing on more details in the track.
During mastering, it might be a bit more difficult to put all the multitracks together.
For the best track results, we believe that you could mix the multitracks, stem them, then proceed to mastering the final product.
The mixing engineer will have created more intricate modifications.
Plus, stem mastering is better than mastering one whole track or a dizzying array of multitracks.
Where to Look for Stems
Finding stem files usually means you might have to purchase them through online music platforms.
That being said, there are several other ways you can get ahold of stems. Check them out below.
Contact the Original Artist

You may try to contact the original artist and come up with an agreement for legal rights to use their content.
This way usually works best for lesser-known artists.
Other famous artists will probably have to be contacted through their record label and even that route might not be successful.
Contacting other artists is one way to expand your musical network.
It’ll help you increase your probability of working on successful collaborations and build your overall music knowledge.
Contact Record Labels
If you’re trying to go for some big names like Miley Cyrus or DJ Khalid, then you might need to contact their record label.
It’s best not to rely on this method of looking for stems because the chances of securing a big name are tough and unlikely.
Instead, you might want to consider other ways.
Traxsource

Traxsource provides you with all kinds of stems and samples.
While they don’t offer as many music options as other platforms, they have some distinctive features that put them ahead.
For example, if you’re randomly searching for a good-quality track, you don’t have to go through numerous ones to find it.
Instead, Traxsource has a filter feature labeled “Most Popular” that shows you what most other music producers or DJs are using.
Price-wise, the music sourcing company has similar prices to its other competitors mentioned.
Stem Contests
Some companies like Wavo like to post stem contests, where they provide you with popular music stem files and see your work.
Some of these songs included, “Lost (ft. Chelsea Shade)” by Jai Wolf and “While You Were Young” by BONNIE X CLYDE.
Another company that offers these stem contests is also Splice. Winners in these contests have even been granted cash prizes.
Bleep

Bleep is another online record shop platform that can give you stems.
They don’t have a diverse range to choose from, but they’re still a legit source you can consider.
When it comes to their content, you might find some African, EDM, and lots of techno beats. Their pricing is not too far off from other similar platforms as well.
Native Instruments
If you’re still a beginner at stemming or music production in general, then you might not want to be spending too much on stem files.
Luckily, Native Instruments, a music production company, can offer you over 65 tracks for free.
You can play around and practice your stemming, mixing, and mastering using these free tracks until you feel confident enough to buy your preferred style.
Unlike other stem-offering companies, Native Instruments holds a wider variety of music options you can choose from.
They have drums, bass, trap, and more beats than you can think of.
JunoDownload

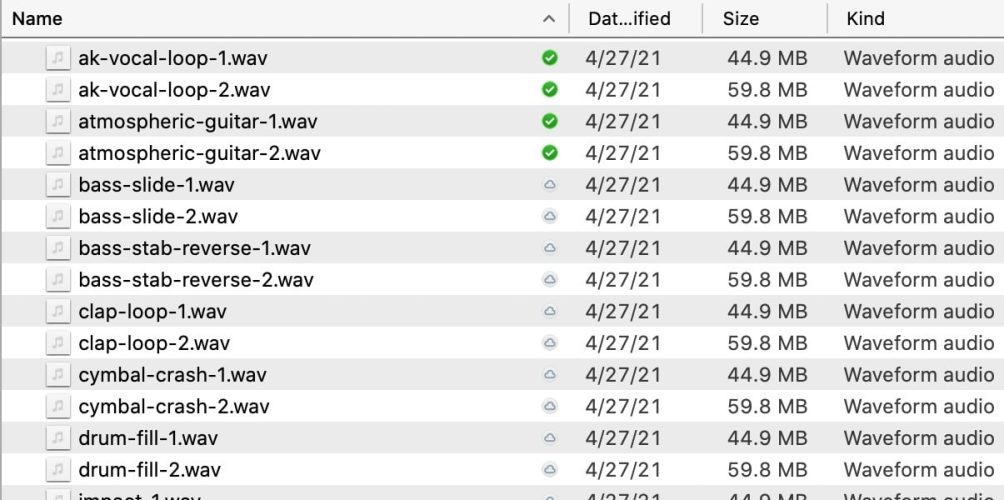
JunoDownload has thousands of stem files to choose from at relatively reasonable prices.
You can also find a lot of different file type options for your track search such as WAV, FLAC, AIFF, and MP3.
You can navigate through their extensive genre categories like techno house, funky, deep house, trap, grime, dubstep, etc.
Beatport
The first source you’ll likely find when searching for stems is Beatport. You can buy bundles of stems at a good price with a wide range of genres.
Their main specialty is EDM and techno music, but you can find all sorts of other beats such as 70s disco and lo-fi tracks.
Like JunoDownload, they have countless tracks and stems available on their website that you’ll want to check out for your next music creation.
Skio

Skio, like Wavo and Splice, also offers stem contests where you can win extra samples.
Some of their online contests were, “Le Youth Remix Contest” and “Coin Remix Contest.” You can access all of these contests and apply to them via their website.
You can also create your original tracks and post them on their page for more exposure and recognition.
How to Use Stems in Music
After getting an in-depth overview of what stems are, how you can benefit from them, as well as where you can find them, it’s time to understand how to use them.
The process mainly involves exporting or bouncing the stem files, but there are initial steps that’ll need your attention. Here they are.
Step #1: Combine the Tracks
This step depends on what kind of tracks you’re left with.
Using samples or cutting and changing tempos in your audio files will leave you with lots of choppy parts.
In this step, you want to add these parts together to make up a single file.

Now, before consolidating these files together, you’ll need to revisit them and listen to any inconsistencies.
You might have to adjust some fade-ins or outs. We also recommend cutting out any artifact or accidental sonic material that’ll ruin the music’s flow.
This step is all about organization and managing to arrange the notes where they begin and end at the same time to make the next step easier.
Step #2: Selecting the Tracks
After having your tracks ready, you’ll want to begin the stemming process.
This means selecting the parts of your song that you will export or bounce into audio files.
You’ll want to be careful in this step because any wrong sizing can wreck the song’s sequencing flow.
To prevent this, you could select the start of the song until where the last effects end.
To make things easier, always listen to the beginning and ending notes of the track to make sure you’ve made the right-timed selection.
Another note to consider is that all stem files should be the same size from start to finish.
This will cut extra production time, where you might have to resync the files once more.
Step #3: Solo the Tracks

Now is the time to single out the tracks you’ll add to your stem files.
This is to keep all the instruments you’re adding organized like the drums, guitar, bass, and so on.
In this step, you want to ensure that there aren’t any interferences within the file. You wouldn’t want to hear any bass in your guitar file and vice versa.
Ignoring this step might cause a hitch in the mastering process in the end and just take up more time during production.
Step #4: Bounce the Tracks
The final step to using stems is bouncing them.
Think of it as saving and exporting all the files you’ve created. You should have a bunch of files lined up by the end of this step.
Keep in mind that you want to limit the headroom to 8dB. Headroom refers to the sum of undistorted sound signals your system can take.
Maintaining a low headroom will give more space for the mastering engineer to add up any extra enhancements that could accumulate more headroom.
How to Export Stem Files in Your DAW
Exporting stem files isn’t necessarily the same on each Digital Audio Workstation (DAW).
Each DAW has its own stem file bouncing process. In this instance, we’ll be discussing five of these software’s steps below.
FL Studio
Step 1: Organize and Rename Your Tracks
First off, you want to access the FL Studio project you’re working on.
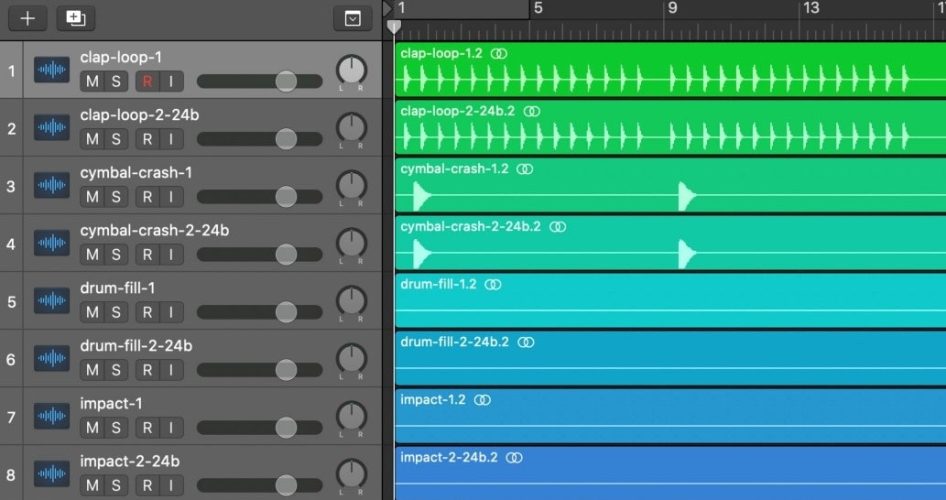
You should be seeing multiple tracks of your work, depending on the amount you’ve created. Within each track, you’ll want to name them according to their stem files.
After naming them with regards to their instruments, (i.e., drum1, drum2, drum3, guitar2, etc.) you can then group them into their mixer tracks to be later converted to stem files.
In other words, the mixer track names will ultimately be their stem file names.
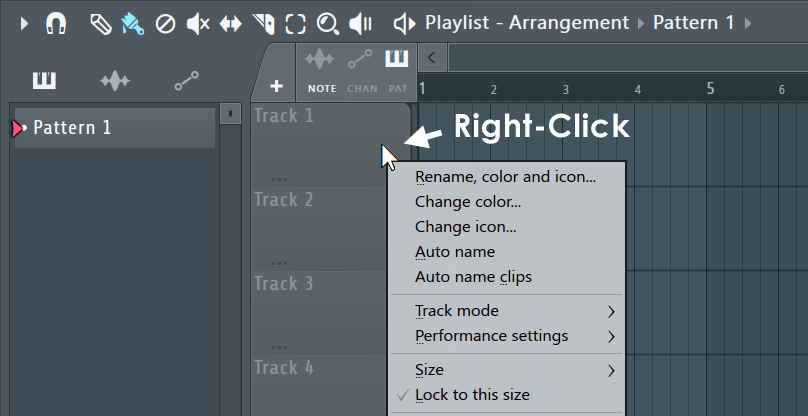
You can easily rename the mixer tracks by right-clicking on them and choosing “rename.”
That’ll help you keep track of each .wav exported file when making them into stem files.
Step 2: Export Audio File
If you’re dividing and exporting the tracks based on single instruments, then in this step you’ll want to mute all other tracks.
Otherwise, you have the option to consolidate several tracks into one full-length stem file.
Let’s assume that you want to export a percussion stem file. In that case, mute all the other sounds.
Afterward, navigate to “File,” “Export,” and “Wave File.” For these steps, ensure that the “Split for Master Tracks” option is not activated.
The settings for “Leave Remainder” and “Stereo” should be checked. Plus, activate the “HQ for all plugins” and “Save tempo information.”
Finally, you just have to click on “Start” after choosing the export file format. The rendering process could take a couple of minutes or so.
Ableton Live
Step 1: Double-Check Your Tracks and Rename Them
Before exporting the files in Ableton Live, double-check the effects you’ve added and make sure everything sounds good.
Then, you can rename the files to create a well-structured stem file list later on based on the instruments.
You wouldn’t want to resync those files all over again during post-production.
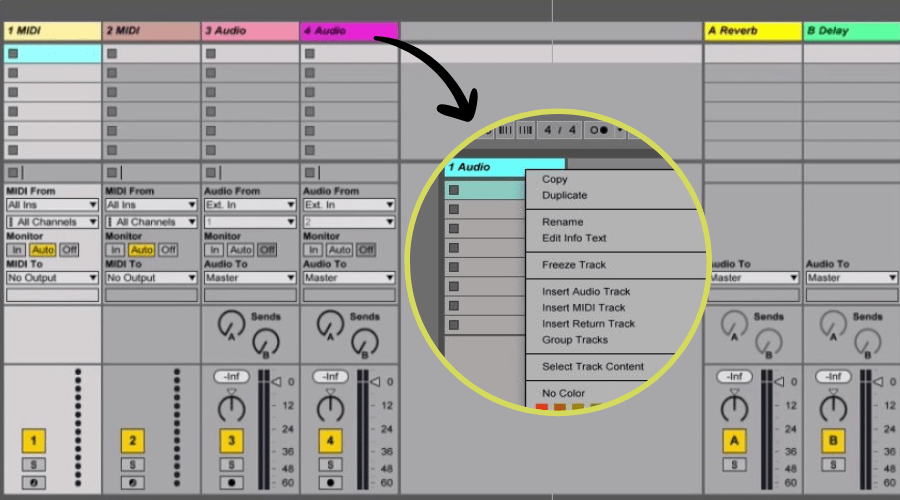
Step 2: Check Export Settings
Prior to exporting and rendering your chosen files, there are a couple of choices you can go about. There are “Master Tracks” and “All Individual Tracks.”
The prior allows you to consolidate all the tracks into a single file, while the latter keeps the stem files divided.
We advise leaving “Render As Loop,” “Normalize,” and “Convert to Mono” features inactivated.
Step 3: Export Audio File
To export, click on “File” and “Export Audio,” similar to the process in the FL Studio software.
There’s also a keyboard shortcut you can use, which is, “Shift,” “Command,” and “R.”
Step 4: Save and Compress
Now that you have your files rendered, save them in a secure location and compress them into a zip file. You’ll have easier access to the stem files.
Logic Pro
Logic Pro’s first steps are almost the same as FL Studio and Ableton Live where you make sure to prepare your audio files and rename them appropriately.
Afterward, you’ll want to click on “File,” “Bounce,” and “Replace All Tracks.”

A pop-up might appear if you haven’t saved the file after making changes, so just click on “Save.”
The following pop-up titled “Bounce Replace All Tracks” will include a few options. The top one is “Bypass Effects Plug-Ins.”
You can simply uncheck depending on whether you want to apply the plug-in changes you’ve included in the tracks.
The second option is “Include Volume/Pan Automation” which is recommended to check. It’ll help balance the volume levels in your exported stem files.
“Normalize” should be kept disabled like in the Ableton Live software.
This option basically stabilizes the headroom to 0dB, which is usually only used if the audio files are quiet.
All you have to do now is press “OK” and your tracks will be converted to audio tracks holding the stem files.
Pro Tools
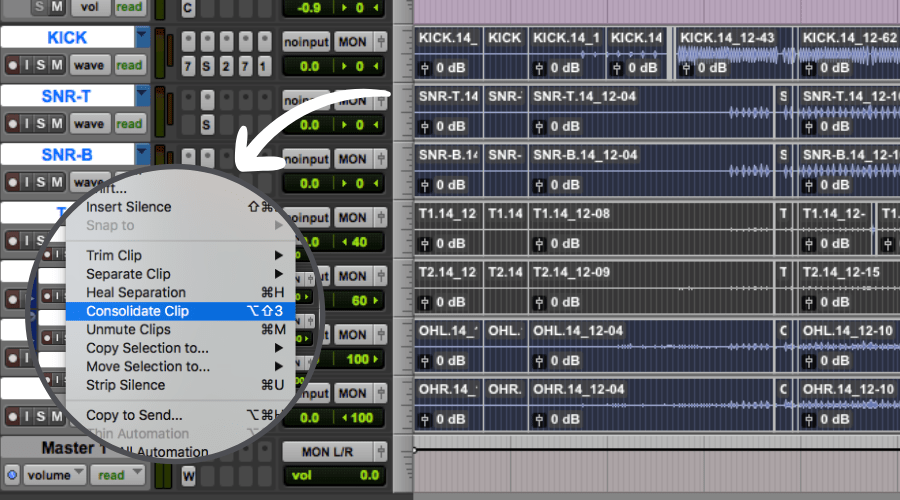
With this DAW option, start by navigating to the selection tool icon and highlighting all the tracks you’re using.
Then, click on the edit menu to “Consolidate Clip” so the clips are all the same length and simultaneous with each other.
Then, using the grabber feature, select the tracks you want to export as a stem file by holding “Shift.”
To bounce, use the keyboard shortcut, “Control,” “Shift,” “K.” A pop-up should appear titled, “Export Selected.”
Check the file type and format, then click on “Export.” You can save it anywhere you’ll find most convenient afterward.
Cubase
Similar to the Pro Tools process, in Cubase, you’ll start by positioning the locators to which tracks you’ll want to export.
You can select all of the tracks and later export them individually. After selecting all tracks, click on “File,” “Export,” and “Audio Mixdown.”
In the pop-up, you should see a sub-section named, “Audio Channels.” In it, you can select the files individually that you wish to export into a stem file.